Gnomes & more gnomes

Have you heard of Rien Poortvliet? I grew up with his beautifully illustrated book Noah’s Ark, and he’s illustrated several more about animals and gnomes.

Gnomes' breakfast

Yes. A scientific look at their physiology, home habits, relationships with animals, and what they eat for breakfast. It’s great. It seems to be a rather popular book, and apparently someone liked it enough to publish The Gnomes Book of Christmas Crafts. And I am lucky enough that my sister got me these two books for my birthday!

Gnomes books

The Christmas Crafts book includes dozens of Gnome crafts inspired by the original book. It includes such gems as:

carved wood welcome sign

gnome quilt
gnome quilt

gnome stained glassstained glass decorations”

One of my favorite parts of this book is how involved many of these crafts are. For example, the stained glass piece says “Skill level: elementary. Knowledge of stained glass essential.” As if all of us know how to do stained glass, and have the requisite tools. Ditto for the carved wood welcome sign up top. Not pictured are several clay projects that require a pottery wheel (maybe in 1980 most crafters owned all these tools?). There are some more accessible crafts in the book (napkin holders, picture frame, tea cozy) that don’t require specialized tools, so I’ll be reporting back once I’ve populated our home with a few more gnomes… Any other crazy, quirky craft books out there?

Posted in fun finds | 1 Comment

Maga-trash: recycling magazines into a trash can

I don’t know about you, but every month we get several catalogs from companies we ordered one item from three years ago, and “magazines” that we barely read (I’m looking at you, AAA Magazine). I feel bad chucking them, but after a few clock variations, I was stumped on how else to use them up.

Actually, I wasn’t totally stumped. I wanted to recycle them into a trash can for our studio/guest room, but struggled to come up with a way to make it that wouldn’t be totally time-consuming.

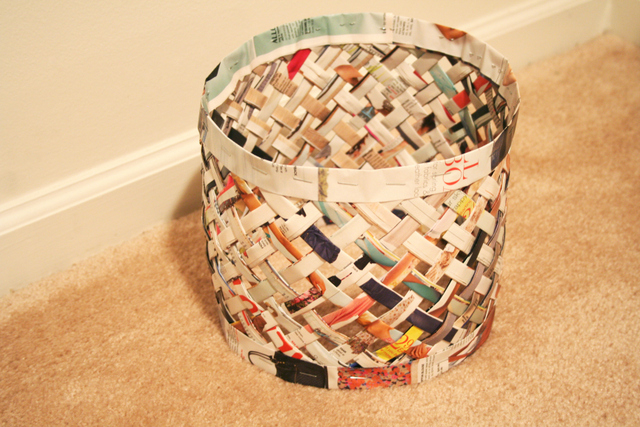
woven magazine trash can

I finally figured it out: woven strips made from old catalog pages, set at 45° angles, let you make a woven piece infinitely long, which you can then join the ends of to make the sides of a somewhat stable trash can.

Woven magazine strips

Here’s the short version of how to do this:

  1. Pull out the staples from an old catalog or magazine
  2. Cut along the fold line, leaving several dozen individual pages.
  3. Fold each piece in half, lengthwise, 4 times, or until each strip is 1/4″-1/2″ wide
  4. Weave the strips together at a 45° tilt, lining up the bottom edges of the strips along a table edge or other straight edge.
  5. When the woven piece is long enough to suit you, paper clip the ends of the woven mat together so that the last pieces stay in place
  6. Bring the ends of the woven mat together to make a full circle and weave the ends in together (this sounds complicated, and it is, but I found that using lots of paperclips help keep the pieces in place until they’re all woven in)
  7. Fold two more strips of paper, into 1″ wide strips.
  8. Tuck the edges of your circle into the crease of these wide strips
  9. Staple generously around the perimeter
  10. Add a trash bag!

trash can made from recycled magazines

I left the bottom of my magazine-turned-trash-can open, because this will mainly hold paper scraps and bits of thread, so there’s no danger of anything leaking. If you wanted to add a bottom, you could use the same weaving technique, and fold the ends up around the sides before you staple on the bottom rim.

recycled maga-trash, top view

Turning trash into trash! Any other ideas for ways to use old magazines and catalogs?

Posted in home dec, tutorial, upcycling | 2 Comments

Rainbow Clutch

A few days ago, I saw this lovely triangle patchwork pillow that prompted me to play around with some triangles myself. I think what I particularly liked was that these were equilateral triangles, instead of half-square triangles. Half-square triangles are certainly easier to make, but I think equilateral triangles give you more options for how you join them together.
rainbow clutch

I used a rainbow-striped sheet to cut my triangles, and joined them together in two strips, which created some interesting patterns.  For Christmas this past year, my sister-in-law made me a really cute clutch that I’ve been using a lot, so I thought another one would come in handy and be a good way to show off these patchwork triangles.

patchwork rainbow clutch - back

I lined this clutch with light green fabric and a layer of cotton batting (leftover from the robot quilt). A simple buttonhole & fun button finish it off.

rainbow clutch - open

Posted in fabric, finished | 1 Comment

Version 3, dolman-sleeved shirt

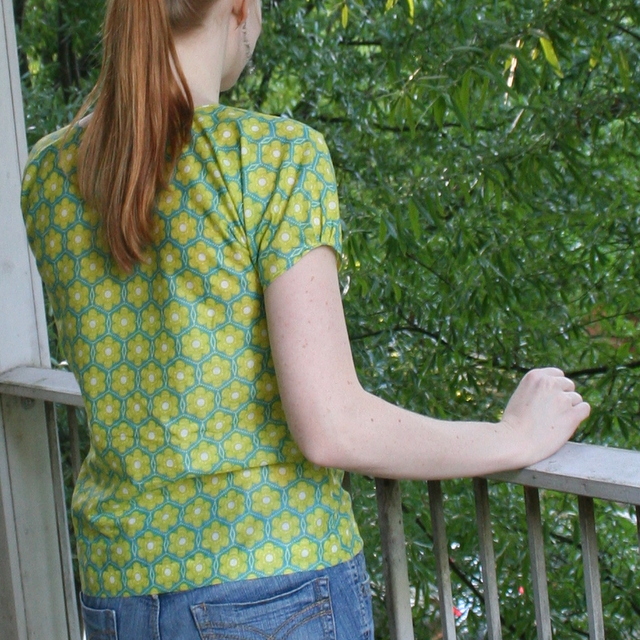
This version of my dolman-sleeved shirt has short sleeves (previous tops here and here), just in time for spring. Cute top + jeans is pretty much my uniform for work, and since it’s already hot in Hotlanta, it was time to add some variety to my selection.
dolman sleeve shirt side view dolman sleeve shirt on me

This top is made with Anna Maria Horner’s Little Folks voile, which is really nice to wear – it’s really soft and drapes very nicely.

I added little pleats to the sleeves so they bubble a little bit. It’s not really noticeable from more than 2 feet away, but it helps the sleeve hem lay close to my arm.
pleated sleeve detail

This is my favorite of the dolman-sleeved shirts I’ve made this spring. I think I will make a few more short-sleeved ones similar to this – just as soon as I buy some more voile! A bonus of this sleeve length is that the shirt can be made with less than 1 yard of fabric, and just two seams! This one probably took me 2-3 hours, and that included French seams and making sleeve pleats.
voile dolman-sleeve shirt

Posted in clothing, finished | 1 Comment

Orange paisley dolman-sleeved shirt

cotton dolman sleeve - orange paisley

After the success of my last dolman-sleeved shirt, I’ve been working on progressively more summery versions. This is an elbow-sleeve length in orange paisley cotton.

I attempted to draft a pattern off the previous dolman shirt I had made, but after sewing it up, it was way too loose. So I took it in several times until it fit, and added darts in the front. Besides the sleeve length, the main difference between this shirt and the previous attempt are the darts, and a facing for the neckline finish instead of bias tape.

I’m contemplating writing a tutorial on how to make a dolman-sleeve shirt – anyone interested? I’m going to try this pattern yet again in a shorter sleeve, with the dual goal of finessing a pattern for myself so I can whip these out, and to see if I can make it work with just one yard of fabric.

Posted in clothing, finished | 3 Comments

Cotton dolman sleeve shirt

It’s long been a goal of mine to make a shirt that 1) is made out of cotton/non-stretch fabric and 2) does not require zippers, buttons, or other fasteners.

I have been generally disappointed by the selection of stretch/apparel fabrics at my local fabric shops, but they do have plenty of cottons of all styles. Plus, cotton (or non-stretch) fabric is generally cheaper, and is findable at thrift stores, in the form of old sheets. My avoidance of fasteners is primarily because those tend to require a special trip to the store to get a matching color, the right size, etc. So my goal has been to make a shirt that meets those two criteria and hopefully looks good!

My latest attempt is this dolman sleeve shirt with 3/4 length sleeves.

I’ve noticed a trend lately of these dolman-sleeve shirts. As far as I can tell from looking at them, they basically don’t have an armhole seam and instead use just two main pieces of fabric, one for the front+front sleeves, and another for the back+back sleeves, with an arced seam to distinguish the arms from the bodice.

This seemed pretty easy to figure out how to make myself, since it’s basically two giant rectangles of fabric sewn along the arm and side. I made a couple of muslins first to figure out where to sew the seam and how “baggy” to make the armhole (verdict: not baggy). One of those versions had front darts, which I think I may try in my next iteration of this.

This particular shirt is sewn from just one main piece of fabric, so the only seams are along the sides. The neck is bound with handmade bias tape cut from the leftover fabric. As you can see, I am super excited that this experiment turned out so wearable.


Posted in clothing | 7 Comments

Custom-made wall-hung bookshelf

Last time on La Casa de Crafts, we were cutting lots of boards. We’ve finally turned those boards (which we purchased almost 2 years ago!) into a custom-made, wall-hung bookshelf.

For the almost-3-years that we’ve lived here, this entire wall above our couch has been empty. We have 9′ ceilings in the living room, so it seems particularly bare. We dreamed up this large (but not too heavy) bookshelf two summers ago and purchased the wood, only to realize that our scroll saw was not good for cutting straight lines. So we procrastinated for a couple of years, until we got a circular saw for Christmas this year. After cutting all the boards to size, we screwed in a lot of brackets:

And built two narrow shelves like this, each 12″ wide:

We screwed a 6′ board across the top of the two narrow shelves, then attached more brackets to the bookshelf, and screwed those into the studs. We only broke one screw in the process (pictured below, actually).

Then we spent an hour running around the apartment, collecting books and other random odds and ends to put on the shelves.

The finishing touch was hanging a Joan Miró print that my brother had gotten me years ago. The goal is to make this a rotating display, and swap out the books and art every now and then. The final step was rearranging all our other bookshelves, which somehow don’t seem to be any emptier.

finished wooden wall-hung bookshelf

A few technical details: this was constructed with 1″x8″ pine boards. Each narrow shelf is 12″ wide. The top shelf is 6′ wide. From bottom to top, the shelves are 11″, 10″, and 8.75″ tall. We’re not quite sure why those dimensions, but by the time we started building these, we had lost the original designs, and had to recreate it based on the length of wood that we had! All in all, this project was pretty straightforward, and only took a few Saturday afternoons to put together.

Posted in home dec, wood | 1 Comment

This week at la Casa

…cutting wood, for two-years-in-the-making bookshelves. Finally possible due to the Christmas addition of a circular saw!

re-soled slippers

…re-soling slippers

…meeting the recipient of these booties

…daydreaming ideas for a king-sized art quilt!

Posted in Etc | 1 Comment

How to make magnets from a map

a map of magnets

A few months ago, I saw a pin of a map turned into magnets, and thought it was a pretty nifty idea, especially in our geography-deprived country.

However, after reading the article about this project, I realized that the map in question started out as a puzzle, which while surely making the magnet-making-process a lot easier, didn’t help a whole lot for me, since I didn’t happen to have a map-shaped puzzle on hand.

So I set about to make my own set with materials I had on hand (or could get for free). Here’s how I did it:

supplies to turn a map into magnets

Supplies:

  • A map – a US map or world map works well, as long as there are individual entities within the map with defined boundaries to define your pieces. If you’re a AAA member, you can get free maps from them.
  • Mod Podge or glue stick
  • Scissors
  • Magnet strips (I used 1/2″ wide strips)
  • Old greeting cards or other very stiff, thin cardboard – regular cardstock is still quite flimsy when you are pulling these on and off the refrigerator, and heavy chipboard is hard to cut through with detailed edges

Making the Map Magnets:

  1. Cut a greeting card along the fold to create two flat pieces of card
  2. Cut out a section of the map, along state lines, so that the entire section will fit on one piece of your card. I started with New England:
    Map into magnets - step 2
  3. Spread a very thin layer of Mod Podge on the non-shiny side of the card (it should barely be wet) and carefully smooth the map piece onto the Mod Podge, rubbing out any wrinkles with your fingers. If it looks like it’s curling up, place under a book for a few minutes while it dries.
  4. Once dry, cut out the states along the state lines. I chose to ignore the city names that were overlapping the states, and just cut right through them. I also cut off the water so the state shapes are distinctive. If you are having difficulty being as precise as you would like with the borders, you can use an X-acto knife to get the little details.
    cut-out states for magnets
  5. Cut a bit of magnet strip that will fit within the state shape (Rhode Island is a fun one). These magnets are light, so you don’t need much – 1/2″ to 1″ long should hold most states.
  6. Glue or tape the magnet to back of the state shape.magnets added to state shapes
  7. Repeat for all the states, or however many you want to turn into magnets
  8. Test yourself on your geography knowledge!map magnets on whiteboard

For the bigger states (as they say, everything is bigger in Texas), you can use a piece of posterboard or part of a cereal box.

I was making these magnets with what I had on hand (cost = $0!), but if you have magnet sheets, you could Mod Podge the map directly to the sheets, and cut out the shapes from there. If you have access to a laminator, that would add some durability to these, too.

If you give this a try, leave a comment below and let me know how it goes!

Posted in Etc, home dec, tutorial | 3 Comments

Baby Booties

finished baby booties

The list of my friends that are having babies just keeps growing! For the past couple of years, my go-to gift for baby girls has been the Itty Bitty Baby Dress from Made by Rae (a few of my versions here and here). However, for Christmas I got a copy of Handmade Beginnings, a sewing book full of projects for babies, for moms-to-be, for dads(!) and for the home. I was pleasantly surprised by how many projects in the book could very easily be for non-baby applications – pillows, quilts, a messenger bag, etc. I marked a bunch of projects I wanted to try, and one was the “cute as a button” booties, which seemed perfect for a new-baby gift.

Conveniently, my sister gave me some fabric over Christmas that she had cut out for a tiered skirt years ago and has since given up on making, which happened to include some pink prints, perfect for a pair of baby booties. These booties took a little over two hours to make, and came together pretty easily. Next time I might alter the inner sole, which is attached via fusible interface. I’m a little unsure if the soles will actually stay attached that way. Has anyone relied on interfacing to connect fabric pieces? Does this really work?

baby booties, top view

Posted in childhood, clothing, fabric, finished | 6 Comments